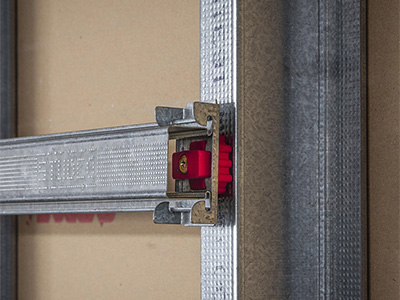
Introduction: Converting your garage into a soundproof music or gym room can be a rewarding project, enhancing your space for creativity or workouts without disturbing others. Utilizing specialized soundproofing products like furring channels with resilient clips, along with insulation, is a key step towards achieving excellent sound insulation. In this guide, we’ll walk you through the process of soundproofing your garage for a music or gym room using the provided product links.

Step 1: Gather the Necessary Materials
Before starting the project, gather the materials you’ll need:
- Furring Channels with Resilient Clips for walls
- Furring Channels with Resilient Clips for ceiling
- 92mm Metal Studs
- 92mm Metal Tracks
- Glasswool Insulation for walls R2.5 HD and ceiling R5
- Soundstop plasterboard sheets
- 16mm Flat head screws to secure metal tracks and studs together
- 32mm Fine thread Screws to secure plasterboard
- Measuring tape
- Level
- Screwdriver or drill
- Safety gear (gloves, goggles, mask)
Step 2: Prepare the Garage Space
- Clear the Garage: Remove any items from the garage to create a clear working space.
- Clean and Inspect: Clean the garage thoroughly and inspect the walls and ceiling for any repairs needed before starting.
Step 3: Install Furring Channels and Metal Studs
- Install Metal Studs for Walls:
- Measure and mark the positions for the metal tracks on the floor.
- Attach metal tracks to the floor and ceiling using anchors or dynabolts
- Fit in the metal studs to the tracks, ensuring they are securely screwed together by a 16mm flat head screws. Use spacing 450 centers or 600 centers.
- Install Furring Channels and Resilient Clips for Walls:
- Attach the furring channels horizontally to the metal studs, using resilient clips to isolate the channels from the studs. Resilient mount clips will reduce an impact noise. Install them 450 or 600 centers apart.
- Install Furring Channels and Resilient Clips for Ceiling:
- Install the furring channels with resilient clips horizontally on the ceiling if any liveable space over to reduce an impact noise.
Step 4: Install Insulation
- Wall Insulation:
- Cut and fit insulation between the studs to fill the wall cavity. It can be 430mm or 580mm wide 90mm R2.5 HD glasswool insulation to reduce overall noise levels
- Ceiling Insulation:
- Place insulation between the furring channels on the ceiling. It can be 430mm or 580mm wide R3.5 to R6 glasswool insulation to reduce overall noise levels
Step 5: Install Soundstop Plasterboard Sheets
- Walls:
- Attach 10mm or 13mm Soundstop Plasterboard sheets to the furring channels using 32mm fine thread screws. Ensure a snug fit.
- Ceiling:
- Attach 10mm or 13mm Soundstop Plasterboard sheets to the furring channels on the ceiling using 32mm fine thread screws, ensuring a secure and even installation.
Step 6: Finish and Test
- Seal Seams and Joints:
- Seal all seams and joints with 3 coat finishing system (Base coat ant Top coat) to ensure airtightness and maximum soundproofing.
- Test the Soundproofing:
- Test the soundproofing by playing music or creating noise inside the room, ensuring minimal sound leakage outside.
By following these steps and using the provided products, you can successfully transform your garage into a soundproof music or gym room, providing you with a space to enjoy your activities without disturbing others.
